
P015
Adjustable Silk Sleep Masks: Strap and Fit Mechanism Development
An adjustable silk sleep mask is defined by the route between its mask body and its moving strap system. Before your team invests in artwork, packaging, or a volume comparison, decide how the mechanism operates, where it sits, what range your buyer will measure, how the anchors are built, and how the rear of the product should look in use and in the pack. These modules turn that mechanism-led design problem into a clear B2B development brief.
Published by China EverBen Silks Reviewed by Mark Liu
Avoid treating an adjustable strap as a generic feature
Identify the adjustment type, range method, hardware, anchor, strap path, and wearer-fit criteria.
Choose the Adjustment Method Before Styling the Mask
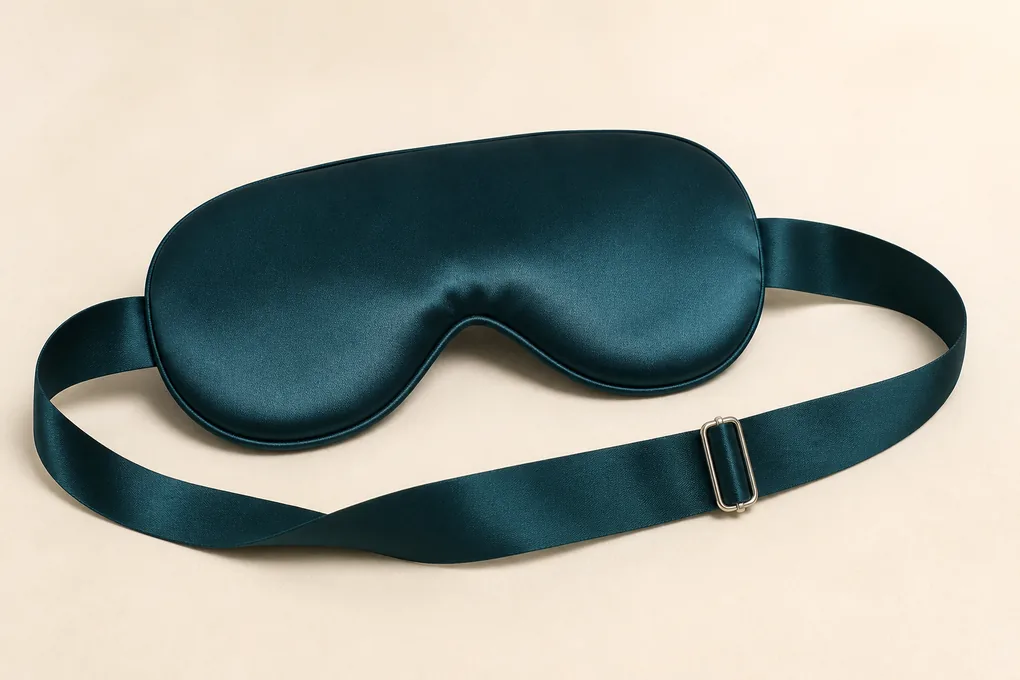
An adjustable silk sleep mask should begin with a mechanism choice, because the hardware or elastic route determines the pattern, strap path, anchor construction, pack fold, and the words a buyer can responsibly use about fit. “Adjustable” is not one construction. It may describe a slider on a narrow strap, a covered elastic route, a hook-and-loop arrangement, a buckle, a tie, or another buyer-defined system. Each has a different visible appearance, operating action, component list, and sample question. We ask a B2B buyer to name the adjustment method being considered and to describe the product outcome that matters: a cleaner back profile, a particular travel-pack format, an easy-to-understand movement, a branded hardware detail, or a chosen range of adjustment. The answer should not become an unverified statement that one configuration suits every wearer. Instead, the development brief can establish what your team needs an actual sample to demonstrate. Put the mechanism in a component drawing with the body, outer and inner textiles, strap direction, anchors, and any metal or plastic part. State whether the adjustment is visible from the front, side, or reverse; whether it is meant to be concealed; and how it should appear once the unit is folded. If your range includes a fixed-strap companion mask, make the mechanism difference explicit in product and pack data. A consumer should not have to infer it from a shared photograph. This early definition gives product, sourcing, and quality colleagues one clear route to examine before creative styling or quantity comparison adds further variables.
Select one adjustment route for the first sample
Slider, covered elastic, tie, buckle, or another named system
A category word cannot replace a mechanism
Name the movement the customer will use and show it in the current drawing. If two routes are still under review, create two distinct options rather than blending their features into one description. Each option should have its own visible appearance, component list, and sample question. That lets purchasing compare real configurations rather than a broad promise of adjustability.
Connect the mechanism to the product’s rear view
Visible hardware, covered strap, and operating access
The back profile is part of the design
Mark what a customer sees when the mask is turned over or worn from behind. A slider, buckle, or tie may be a functional feature and a visible brand choice. The sample should show the mechanism in its normal operating position and in the folded pack condition. This helps avoid an approved front view with an unresolved rear construction.
State what the mechanism sample must prove
Movement, visual balance, or pack presentation
A defined review protects the buyer brief
Ask the first sample to demonstrate a specific customer-facing question, such as access to the adjustment point or the alignment of the strap path. Keep performance criteria in your controlled quality specification where applicable. The product brief can record what is physically observed on the selected sample without making an unsupported universal-fit or durability claim. Before approving a route, retain one back-view reference showing the chosen mechanism in the operating position. It gives marketing, packaging, and sourcing teams a shared picture of what makes this adjustable version different from a fixed-strap mask and prevents a generic product photograph from becoming the only instruction. Make the operating direction visible to the sample reviewer, particularly where the mechanism is deliberately discreet and therefore not evident from the primary product view.
Define the Adjustment Range in Measurable Terms
The range of an adjustable sleep mask must be described in measurable, buyer-owned terms. A phrase such as “one size” cannot tell a pattern maker, sample reviewer, pack designer, or purchasing manager what configuration is being evaluated. Start with the base state: the strap length or adjustment setting at which the mask is measured, the method used to measure it, the reference condition, and the position of the mechanism. Then identify the intended adjustment interval as a product-development input, not a claim of suitability for every person. This is especially important when the system uses a slider or hardware that moves along a textile strap; the travel of the mechanism, the overlap left beyond it, the point at which the strap meets the body, and the visual symmetry can all change across the range. Give the buyer review a common reference: a marked drawing, a technical table, or a physical sample with defined positions. If your programme has a specific target wearer or display form, treat it as an evaluation reference and keep it with the sample record. Do not turn that reference into a published performance statement without the appropriate evidence and approval. The table should also distinguish an adjustment range from a pattern-size change. A larger body, a different strap anchor, or a different pack may require its own SKU route, not merely a different slider setting. Once the team can see the measurable range and its limits, it can decide whether the mechanism supports the product concept, whether the rear profile still looks intentional, and what information belongs in the pack or on a product page.
Choose a reference point for measurement
Base setting, strap position, and method
Every range needs a starting condition
State where the mechanism sits when the sample is measured and whether the strap is relaxed, laid flat, or arranged on the buyer’s nominated reference. This prevents two reviewers from producing conflicting figures from the same mask. Keep the drawing and measurement table together, because an isolated number cannot show which segment of the adjustable system it describes.
Separate adjustment travel from a new product size
Mechanism movement and pattern alteration are not equal
A range label should not hide a SKU change
If the team changes the mask body, strap anchors, or other structural features, treat that as a proposed configuration with its own version. Do not assume a long strap travel makes every pattern equivalent. This makes artwork, packing, and quality review more accurate and gives buyers a clearer basis for allocating quantities across real product variants.
Review the range in the condition your buyer cares about
Operating position, rear view, and folded unit
A table should guide a physical sample check
Use the stated reference positions to look at the mechanism, strap tail, and body balance. Then place the mask into the proposed retail pack. The goal is to observe whether the selected range supports the intended product presentation. Record any revision by position and sample version rather than asking a later team to interpret a general fit comment. Where a conversion between measurement units is needed, retain the buyer’s original method and reference position alongside it. This avoids a situation where a later reviewer quotes a number without knowing whether it described strap travel, full circumference, or a changed pattern configuration. This level of precision keeps a product team from approving a pleasant-looking sample that cannot later be measured against the same buyer reference.
Select Hardware and Strap Materials for the Chosen Route
Hardware and strap materials should be selected as one adjustment system, not as separate decorative purchases. The buyer needs to see how the selected slider, ring, buckle, tie, or covered elastic route interacts with the strap width, thickness, surface, body fabric, and intended operating action. Begin by listing every component: the visible or hidden hardware, the adjustable strap, any elastic segment, the reinforcement at the anchors, labels, and the materials that meet the skin-facing and outer silk panels. A small piece of hardware can alter the profile of a light silk accessory; an unsuitable width can interrupt an intended back view; an unplanned contrast can make a product look less coherent after it is folded. We do not describe a hardware option as durable, hypoallergenic, or suitable for every customer unless the buyer has a defined requirement and appropriate evidence. Instead, we identify the physical decisions your sample must allow the team to inspect: operating access, edge contact, movement through the selected strap, visual colour relationship, and the way the part is protected in the sales pack. If the programme uses branded hardware, supply the current artwork or identity reference and state whether it controls the visible front, rear, or packaging message. If the system should be discreet, show the desired concealment route in the drawing. By treating component selection as part of one mask architecture, the buyer can avoid an awkward situation where an attractive silk body is paired with an adjustment detail that was never evaluated in its final position.
List the mechanism components as a connected assembly
Hardware, strap, reinforcement, label, and body interface
A small part can change the full product
Create a line for each component and state its visible role. A slider cannot be assessed without the strap it moves along, and a strap cannot be assessed without its anchor and adjacent edge. This map supports a fuller material discussion and prevents a sample from being reviewed as though the outer silk panel is the entire product.
Match component scale to the intended rear profile
Width, thickness, colour, and concealment route
The adjustment feature should look intentional
Use a back-view reference to judge how the mechanism appears against the body. Mark whether it should blend, contrast, or sit under a covering detail. Then assess the sample in a normal and folded state. This is a practical product-design review, not a blanket statement about the component’s technical performance or customer suitability.
Protect the selected system in the retail unit
Movement control, fold route, and contact points
Packaging is part of the mechanism decision
View the completed mask in its proposed pouch, sleeve, or box. Note where hardware or strap tails rest and whether they touch a visible silk surface or product-information panel. If the pack needs a different fold, record that as a packaging change instead of changing the mechanism by assumption. This keeps the buyer’s product and presentation decisions connected. The component list should be reviewed before product statements or pack artwork are finalised. It allows a buyer to describe the selected silk surfaces accurately while keeping mechanical and support components visible to the people responsible for labels, packaging, and product information. It also gives the buyer a disciplined way to explain the product to commercial colleagues without replacing a material record with a marketing shortcut, especially when a visible silk face and functional adjustment route need accurate, distinct descriptions.
Draw the Strap Path From Mask Body to Adjustment Point
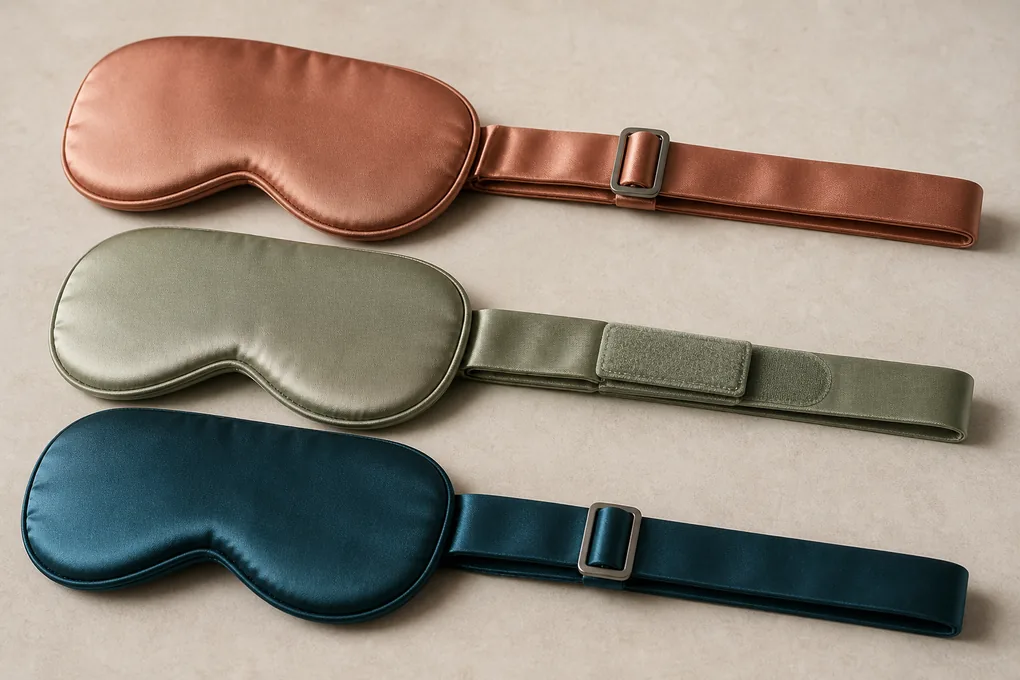
The strap path should be drawn from the mask body to the adjustment point before the sample is judged for style. On an adjustable mask, the strap may travel straight across the back, divide into two sections, pass through hardware, return under a cover, or interact with an elastic section. Each route affects the product’s visible balance, the length of the strap tail, the location of bulk, and the way the mask folds. We ask buyers to mark the left and right paths separately even when they appear symmetrical in a concept image. That drawing should show the anchor points, the direction of travel, every change of material, every mechanism, and the resting position expected when the product is worn or laid flat. If a strap is meant to be concealed, say what covers it and whether the cover belongs to the mask body, a separate channel, or the pack. If the adjustment point is intended to be reachable while the product is worn, make that an explicit sample question. A movement route can feel obvious to a designer who knows the concept, but it is easily misread by a team receiving a single front photograph. The drawing also helps review the relation between a directional print or border and the strap attachment. A strap path that crosses an artwork zone or folds over a visible edge can alter the product’s story. Your buyer-controlled reference should therefore describe the intended rear and side views, not only the customer-facing front. This makes the adjustment feature part of the product design rather than a last-minute utility addition.
Draw both sides of the strap route
Anchor, travel direction, hardware, and tail
Symmetry should be shown, not assumed
Use a back-view drawing with left and right anchor positions, arrows for travel, and labels for each adjustment component. If the routes differ, state why. The visual record allows an evaluator to see where a strap crosses a border, label, or body edge. It also helps identify whether a sample has followed the intended configuration before feedback begins.
Identify places where the path changes thickness or direction
Hardware junction, cover, channel, and return route
Bulk must be assessed in the finished assembly
Mark every transition where a strap meets hardware, turns through a channel, or changes from adjustable to fixed. Those locations should be visible in the sample review. A thin, smooth rear profile may require specific construction choices; a buyer cannot judge that from a material swatch alone. Record the result by location and current revision.
Check the route in packed and relaxed conditions
Folded strap, stored tail, and customer-facing presentation
The back design travels into the pack
Place the sample into its intended selling unit and note whether the strap needs a defined fold or restraint. Inspect the product after removal as well as before packing. This makes it possible to decide whether the issue is a pattern route, a packaging route, or an instruction that needs clarification before the product moves further. A copy of the approved path drawing should remain attached to the sample record. It helps future reviewers distinguish an intentional strap route from a sample error and gives the product manager an exact reference when a design or pack discussion resumes. When a strap tail is intended to remain hidden, specify the resting condition in the pack and in use so the sample review has a practical visual benchmark.
Reinforce the Areas That Carry Adjustment Load
Adjustment changes where force, movement, and repeated handling are concentrated, so the anchor areas need explicit attention in the product brief. This does not mean a website should make untested strength promises. It means a buyer should identify the locations where the adjustable route joins the silk body, meets a reinforcement, passes through hardware, or changes direction under a cover. Start with a drawing that marks each anchor and the layers present there. Explain whether the anchor should remain visually flat, whether it is intentionally covered, and how it relates to the outer edge or printed area. If your quality programme has a defined test method, loading condition, or acceptance criterion, retain it in the buyer’s controlled quality documentation. The product-development discussion can then focus on what the sample needs to show: the construction route, the visible finish, the alignment between left and right sides, and the behaviour of the chosen component in normal handling. A reinforcement may be part of the inner construction, a different layer, a folded return, or a selected attachment treatment. It should be specified as a component decision, not assumed because the product is adjustable. We also recommend checking the anchor in the proposed pack condition. An anchor that looks appropriate on a laid-flat sample may create unwanted bulk or a visible line when the mask is folded into a sleeve or box. Clear records let a procurement manager distinguish a construction question from a broad material claim and give the next sample review something concrete to examine directly.
Locate every point where movement enters the mask body
Left/right anchors, hardware return, and covered joins
An adjustable route has identifiable interfaces
Mark the points where the strap meets the body or changes direction. Then identify the material layers and visible exterior at each point. This establishes the product scope without assigning an unverified performance outcome. It gives the reviewer a practical route for checking balance, edge line, and the way the selected construction appears in the finished accessory.
Specify the intended appearance as well as the internal route
Flat, covered, visible, or deliberately structured
The customer sees the construction result
Tell the team what the exterior should look like at each anchor: smooth, defined, concealed, or visually featured. Use a marked reference where possible. A reinforcement can be appropriate yet still need to fit the collection’s visual language. This choice must be reviewed on the actual mask body, because the edge, silk surface, and strap angle affect what customers see.
Keep formal quality requirements in their own controlled record
Buyer test method, acceptance condition, and evidence route
Development notes should not invent a claim
Where your company requires a specific performance check, attach the appropriate requirement to the RFQ or quality brief. The page-level product record should explain the physical construction and sample observation. This separation helps the team communicate clearly: a visible anchor detail can be assessed on sample, while a formal result belongs to a defined testing and approval process. When the buyer adds a reinforcement requirement, make sure the current mask drawing shows its location and visible consequence. This keeps a quality or construction instruction from silently changing the external profile, print area, or retail presentation that the brand team has approved. The resulting record is more useful to a purchasing manager than a general reassurance, because it identifies the exact construction point under consideration.
Coordinate the Mask Body and Adjustable System
The mask body and adjustment system should be designed as one offer. A contoured silk front can appear elegant on a mood board yet lose balance when a bulky adjustment point, exposed strap tail, or misplaced anchor is added. Conversely, a well-functioning adjustable system may look disconnected if the body’s edge, artwork, and rear profile do not acknowledge it. We encourage buyers to review the complete mask architecture: front shape, reverse, internal layers, edge profile, strap entry, movement route, adjustment location, and retail fold. Begin by deciding which element leads the customer impression. It might be a minimal silk face, a sculpted contour, a decorative print, a refined rear mechanism, or a coordinated bedding collection. That priority helps resolve trade-offs when a detail cannot be both invisible and highly accessible. Then use an actual sample to compare the complete silhouette from front, side, and rear. A flat drawing can guide the pattern; it should not be the final evidence for the assembled product. Mark any feature that must remain aligned when the mechanism is moved, such as a centre seam, print motif, piping line, or label. If the team is considering alternate body and adjustment combinations, give every combination a clear version. Do not approve the body in one sample and assume a different adjustment assembly belongs to the same product. This integrated approach supports a better B2B conversation because suppliers receive the true product configuration, while buyers receive a sample that can reveal interfaces before volume, packaging, and content creation move forward.
Review front, side, and rear as one silhouette
Body contour, mechanism profile, and strap line
A product is not only its hero image
Place the sample on a flat surface and in the buyer’s selected viewing condition, then inspect all three views. Look for the relationship between front style and back mechanism, especially where the strap joins the edge. A clear review notes the observation by view and location. This enables a product revision without treating an isolated hero photograph as the complete specification.
Decide what should be discreet and what should be visible
Access, concealment, and brand detail can conflict
Priority should be buyer-owned
Write which element matters most to the customer experience: a clean rear, easy access to adjustment, a visible branded part, or another named feature. An adjustment point cannot be both entirely hidden and immediately accessible without a defined route. This decision helps the sample team assess a genuine product trade-off rather than trying to fulfil contradictory adjectives.
Version every body-mechanism combination separately
Pattern route, artwork, and pack should follow the version
One approval cannot cover a different assembly
If the buyer changes the body shape, anchor position, or mechanism type, issue a new configuration name in the product file. Link its artwork and pack concept to the same name. That simple discipline prevents a fixed-strap or earlier adjustable sample from being mistaken for the current product. It also gives purchasing an honest basis for comparing options. A complete-mask review should also include the chosen product image direction. If the customer-facing hero image presents only the silk front, the buyer still needs a controlled rear and side reference to ensure that the adjustment system has been resolved, not ignored. That full-view check is particularly important when a product is marketed in a collection where the front appearance and rear mechanism must feel equally considered.
Control Silk Scope Across Face, Lining, and Mechanism
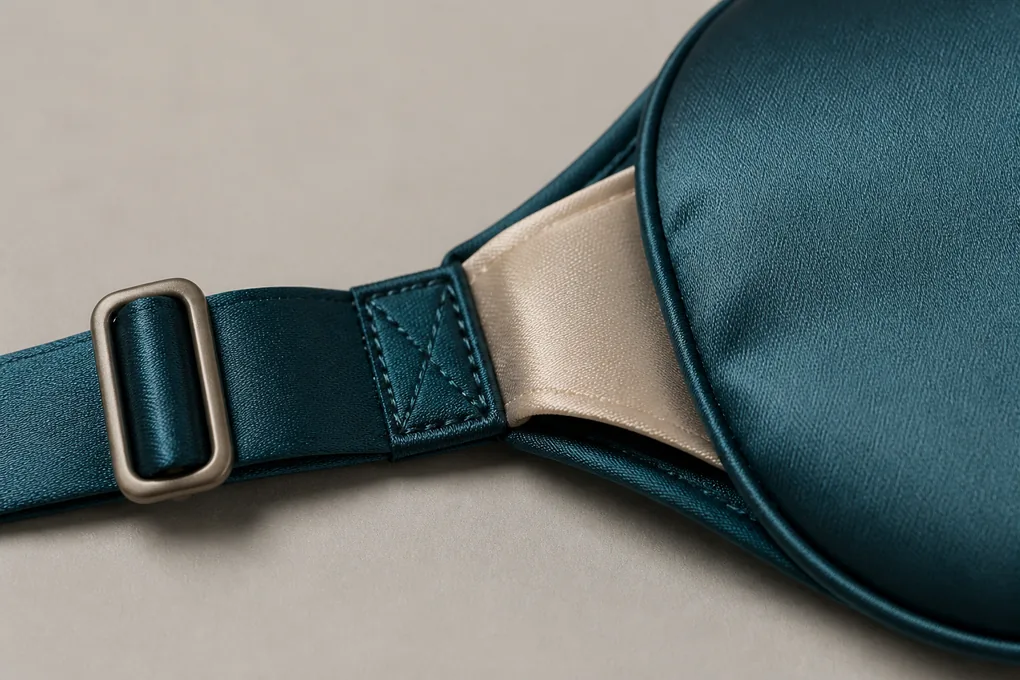
Silk scope on an adjustable mask needs careful, component-level language. The buyer may select silk for the outer face, a silk wearer-facing surface, or both, while the adjustment strap, elastic, hardware, internal layer, label, and pack use other materials. That is not a weakness in the product; it is the actual assembly and should be described accurately. Start by listing the materials and their roles. Identify which surfaces the customer sees, which surfaces contact the wearer, which support the adjustment route, and which are solely packaging or information components. Then connect those roles to the sample. A swatch may establish colour or hand direction, but the finished adjustable product should be reviewed at the strap anchors, mechanism, edge, and reverse side. We do not suggest that every part is silk merely because the front face is silk, and we do not create claims about skin benefits, sleep, or performance from a material name. Your product and legal teams should approve any final public language against the confirmed bill of materials and market requirements. This detailed scope benefits purchasing as well: it makes an RFQ more comparable, clarifies which component is being changed when an option is discussed, and reduces the chance that a support part gets missed in packaging or label planning. If your brand wants a particular sheen or smoothness on the visible mask face, show it in a sample reference and state the viewed condition. If the mechanism needs a material choice that contrasts with that face, make it a deliberate design decision. The outcome is a product record that is both more technically useful and more credible to a sophisticated buyer.
Describe materials by function rather than headline
Visible face, wearer-facing side, strap, mechanism, and pack
Precise scope supports honest buyer copy
Create a component list that identifies what each material does in the adjustable mask. A silk outer panel, a strap material, hardware, and an internal layer should not be collapsed into one slogan. This gives brand and compliance colleagues a clear starting point for any final product statement. It also helps a reviewer see whether the sample matches the material direction that the buyer actually approved.
Review the silk surfaces where adjustment meets the body
Anchor, edge, reverse, and folds
The interface is part of the finished textile product
Inspect the front and reverse near the strap anchors and any point where the adjustment system changes the body profile. A chosen silk surface should be assessed in the final construction, not only as a clean cutting. Record whether a visual question concerns the textile, the seam route, the hardware, or the pack fold. That keeps next-step decisions accurate.
Keep marketing claims downstream of confirmed product facts
Bill of materials, buyer review, and market approval
Product language should follow the final assembly
Use the completed component record and your internal approval process before publishing fibre, care, or benefit language. The development page can help assemble the required inputs, but it cannot validate a claim. This approach is practical for B2B buyers who need materials, construction, and product communication to stay aligned across sourcing and launch teams. Before final copy is approved, compare the current component list with the visual sample and any stated fibre scope. This keeps a broad silk description from inadvertently covering a strap, hardware part, inner layer, or label that belongs to a different material role. A good component record also lets a buyer identify which question belongs to the silk construction and which belongs to the adjustment hardware or packaging.
Plan Color, Print, and Hardware Appearance as One Offer
Colour, print, and hardware appearance need to be considered together when a silk mask includes an adjustable mechanism. The customer may first notice the silk face, but the rear strap, slider, buckle, or other adjustment point can become part of the product’s visual story when the mask is worn, displayed, or unpacked. Begin with the intended colour relationship: should the strap disappear into the body, create a measured contrast, repeat a collection accent, or allow hardware to become a deliberate feature? State the controlling colour or artwork reference and the product version it belongs to. A flat print file does not establish how a motif will sit across a contoured mask body or where a visible hardware element will interrupt the rear view. Use a finished-body template to mark clear zones, direction, and any area that should remain free of artwork. For a solid-colour programme, review the visible silk face, strap material, edge treatment, and adjustment part in the same sample context. A silk surface may read differently across a curve or under different lighting; that is why assembled buyer approval is valuable. It is not a reason to guarantee a shade without an approved reference. When a pack includes a window, sleeve opening, or product photograph, decide which view represents the style and whether the mechanism should be visible to the customer. This avoids a common mismatch: a front-only image that leaves the adjustable feature uncommunicated, or a pack image that shows hardware inconsistent with the final product. Record corrections by body, strap, hardware, or packaging panel so that the right owner can act on them.
Set the colour hierarchy for body, strap, and mechanism
Blend, contrast, accent, or concealed detail
The rear view needs a colour decision too
Write what relationship the adjustment system should have to the silk body. A strap can be intentionally tonal, contrasting, or hidden under a selected route, but those are distinct visual directions. Attach the current colour or artwork reference and identify the controlling version. This lets a sample reviewer judge the complete style without guessing whether a visible component is final or provisional.
Place print on the shaped mask, not on a flat rectangle
Motif zone, contour, edge, and anchor clearance
Artwork should respect the final cut
Use the current mask outline to show where a motif, stripe, or logo belongs after cutting and assembly. Mark any area near an anchor or edge that must remain clear. A sample is then able to show the product your customer sees rather than an artwork file that made sense only before construction. Keep print directions connected to the named product version.
Review the completed visual offer in its pack
Hero view, rear-mechanism message, and folded unit
Packaging should not contradict the product
Look at the filled pack beside the sample and decide what the customer learns before opening it. If the mechanism is a relevant feature, confirm whether it is shown, named, or deliberately kept discreet. Record any correction by the correct element. That protects the brand image and makes customer-facing information more likely to match the product actually inside. For a print or colour programme, retain the approved image of the actual formed mask with its rear components. It is the simplest way to maintain the intended relationship between the silk face, adjustment system, edge detail, and customer-facing pack across later revisions. It gives designers a way to correct a specific placement issue without changing the product name, material scope, or other settled attributes by mistake.
Approve Operation During a Focused Sample Review
A focused sample review for an adjustable silk sleep mask should include operation as well as appearance. The buyer needs to see the mechanism at the stated reference settings, move it through the intended route, inspect the strap and body relationship, and examine the product in the condition it will reach the customer. Start by verifying the sample version: body outline, outer and inner material direction, strap system, hardware or adjustment route, anchors, edge finish, artwork, labels, and proposed retail pack. Then agree the sample sequence. Examine the mask flat for construction, symmetry, print placement, and edge line. Use the buyer’s chosen reference condition to look at the strap path and access to the adjustment point. Move the mechanism as the product is designed to be moved, without turning the observation into an unsupported claim of universal fit or quantified durability. Finally, review the packed unit, including where the adjustment system sits after folding and what the customer sees first. Each observation should be recorded by component and location, with one buyer decision owner consolidating comments. A change in strap path is not the same as a concern about pack fold; a request for a different hardware colour is not the same as a change in material scope. Clear categorisation makes the next sample more useful and protects the commercial brief from vague comments. If your quality team requires formal testing, include the appropriate method and acceptance requirement separately. The product review can then remain grounded in what the sampled configuration visibly and operationally demonstrates.
Confirm the adjustment configuration before testing the operation
Current body, strap, hardware, anchors, and pack
The wrong sample cannot answer the right question
Use the buyer brief as a check-in list before the review begins. Confirm that the mechanism and strap route match the current product version and record any difference. This prevents a previous sample or provisional component from attracting feedback meant for the released direction. It also helps the team separate a configuration error from an observation about the intended product.
Move the system through agreed reference settings
Access, strap travel, and body balance
Operation should be observed in a defined condition
Use the measurement positions named in the product record and inspect the adjustment point, strap tail, and anchor alignment. Write what the reviewer sees and what decision follows. Do not transform a movement observation into a claim of universal wearability or durability. If a formal requirement exists, keep it in the buyer’s quality documentation with its own method and approval path.
Close the sample review with one actionable revision record
Product change, pack change, or question still open
A controlled response prevents mechanism drift
Collect feedback under the current sample version and identify the owner for each action. Mark whether a point affects the pattern, component choice, artwork, packaging, or a separate quality requirement. This makes it much easier for procurement colleagues to request the next sample or quotation without carrying contradictory notes from several reviewers. A focused review has more value when buyers tell their teams what the sample did not establish. Preserve any open quality, fit, or commercial question as an explicit next action rather than allowing a completed-looking product sample to imply that every decision has been approved. This honest status is valuable when several teams are involved, because it preserves the next decision instead of allowing a photograph to imply more evidence than it contains.

Inspect Function, Symmetry, and Visible Finish Together
Function, symmetry, and visible finish should be inspected together on an adjustable silk sleep mask because one change can affect all three. A slider may operate as expected but sit unevenly in the rear view; a balanced strap route may alter the line of a silk edge; a polished front can be undermined by an anchor that twists when the product is folded. Begin with a versioned finished sample and the buyer’s current drawing. Check the mask body flat from the front and reverse, then compare left and right anchor placement, mechanism location, strap travel, edge condition, and any visible artwork or label. Move the adjustment system through the stated positions and look again at the overall silhouette. The intent is to observe a product configuration, not to infer a medical, sleep, or durability outcome. When a quality plan calls for formal performance evidence, it should specify the method, condition, and acceptance threshold separately. The sample review should still record the physical details your product manager can see: mirrored anchor positions, aligned edges, a strap tail that sits as intended, a mechanism that is accessible or discreet according to the approved design, and a pack fold that does not obscure a required product view. If a question is unresolved, note it as an unresolved decision rather than calling the product finished. This approach gives a buyer an effective way to protect visual coherence and mechanical clarity while keeping claims tied to evidence and internal approval.
Compare the left and right sides against the drawing
Anchors, strap path, and hardware placement
Symmetry needs a visible reference
Lay the finished mask on the current front-and-back guide and observe whether the anchors and mechanism sit where the buyer intended. Mark a difference by location, not by an aesthetic adjective. This supports a practical pattern or assembly discussion. It also helps separate a change in symmetry from a separate issue such as print placement or packaging fold.
Inspect movement without losing the finished visual line
Adjustment positions, edge profile, and rear silhouette
Function and styling meet in the same sample
Move the mechanism through the defined reference settings and review the mask from front, side, and rear. Note whether the visual relationship stays within the direction your buyer approved. The observation is about the sampled product, not a claim about every future customer. Keep any formal performance requirement in its own buyer-controlled test brief.
Use the pack as a final visual check
Folded strap, visible front, and product information
A polished sample should remain coherent in the selling unit
Place the approved configuration into its proposed packaging and check the appearance after removal. The way a strap tail or hardware rests may reveal an issue that was not visible when the mask lay flat. Record whether the correction belongs to product assembly, pack fold, or customer information. That distinction makes the next action clearer. Where a sample observation raises a formal quality question, move that requirement into the buyer’s technical process with the appropriate method and acceptance route. The product page should remain a clear account of the configuration and visible review points, not a substitute for documented test evidence. This separation lets quality colleagues work with appropriate evidence while product, packaging, and sourcing teams continue to use the same versioned physical brief, with each visible observation linked to the mechanism position and product version that was actually reviewed.
Package the Mask So Buyers Can Understand Adjustment
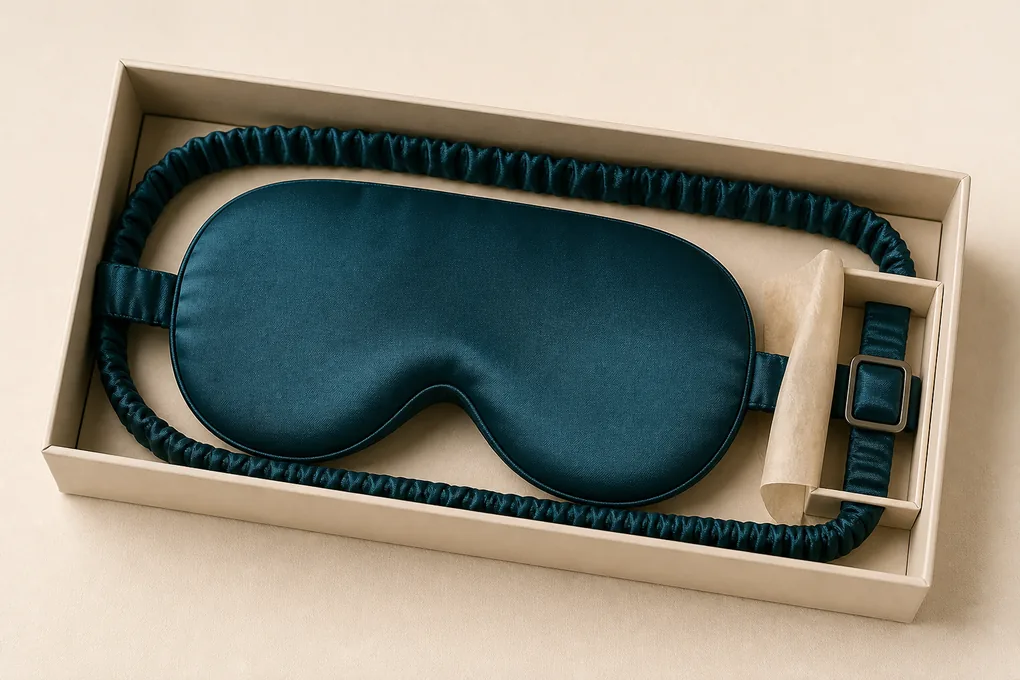
Packaging for an adjustable sleep mask has an additional communication job: it must protect the silk product while helping a customer understand the relevant adjustment feature without overpromising what that feature does. Start with the exact saleable unit: one adjustable mask in the named body, strap, and mechanism configuration, plus only the pouch, sleeve, card, insert, or box your programme has approved. The pack should make it clear whether the adjustment point is visible, where the customer finds it, and what product information is accurate for the final assembly. A generic “one size fits all” statement should not appear simply because the strap moves; any size or fit language must follow the buyer’s approved product and compliance process. We ask buyers to decide the unboxing route, the fold position of the strap, the part of the mask that faces the customer, and any area where hardware needs protection from contact with a silk surface. If the mechanism is hidden in the pack, determine whether an illustration, simple operating note, or another approved information approach is necessary; do not assume a pack image makes the operation self-explanatory. If the mask is part of a gift set, record the full item count and the relationship between the mask and its companion articles. Keep product-copy, care, fibre, origin, and legal language inside the appropriate buyer approval route. We can help organise the physical and presentation inputs, but final commercial statements must represent the product you have actually specified. A filled pack sample is the right place to review fold, protection, information placement, and the customer’s first sight of the mask.
Define the finished selling unit before writing the pack panel
One named mask configuration plus approved presentation pieces
Accurate contents make the pack easier to trust
List the mask, strap system, and any pouch, sleeve, insert, or card as distinct components. If an accessory is optional, keep it out of the base unit until selected. This protects product information from becoming a collage of sample props. It also helps buyer teams compare pack routes without losing track of the exact adjustable mask SKU inside.
Decide how the adjustment feature is revealed
Visible mechanism, illustrated route, or discreet rear detail
The customer should not have to guess at the product
Use a pack mock-up and filled sample to decide what the customer sees before opening. If the adjustment point is a key part of the offer, identify the accurate way your product and brand teams want to communicate it. Avoid performance or fit promises that the file cannot support. The aim is clear product understanding, not overstatement.
Protect the strap and mechanism during packing
Fold route, contact surfaces, and information placement
A pack design is part of the product system
Check the final unit after it has been folded, packed, opened, and laid flat again. Note where hardware rests, whether a strap crosses a visible silk panel, and where labels or inserts sit. A change may be needed in fold method or protective material rather than in the mask construction. Record that decision against the correct version. Before a package is released to artwork, have the buyer review the filled unit beside the current product version. This small step connects the right mask configuration, adjustment information, customer-facing view, and pack components, avoiding a mismatch that a digital mock-up cannot reveal. It also gives ecommerce and customer-service teams a clearer product reference if they later need to distinguish adjustable operation from a fixed-strap companion style.
Give the RFQ Enough Detail for an Adjustable Mask Quote
An RFQ for an adjustable silk sleep mask becomes commercially useful when it tells us which actual configuration the buyer needs to evaluate. Begin with the body form, material scope, outer and wearer-facing surfaces, adjustment method, strap path, hardware or other components, anchor locations, edge treatment, artwork or colour, and selected retail-pack route. State the target market, the quantities split across the actual sellable variants, the delivery destination, and the immediate decision: a mechanism discussion, development sample, pack review, or configuration-specific quotation. Attach the current drawing, measurement table, artwork version, sample images, and pack reference that best represent the programme. If documents conflict, identify the controlling version rather than expecting a supplier to choose based on a photograph. Separate confirmed choices from live alternatives. A buyer might have selected the silk face and body shape while comparing two adjustment systems; those should be presented as distinct routes with distinct questions, not as one undefined “adjustable” item. Be equally direct about information you do not yet have. If a performance requirement, test method, packaging route, or delivery milestone is pending, name it as open and identify the buyer decision path rather than inventing a default. Include the contact who owns the next review so the response reaches the person who can act on it. This is not bureaucracy. It is what allows a procurement team to compare like with like, protects a product manager from an unplanned mechanism change, and lets a supplier respond to the real problem delaying your development programme.
Submit the whole adjustable configuration, not only a front image
Body, material roles, mechanism, anchors, and pack
A quote needs the actual product architecture
List the product-defining choices in a controlled order and attach the current version of the relevant drawing or sample reference. Identify which surfaces are silk and which components support the adjustment system. This allows a clear development or commercial response. It also prevents a different strap route or pack concept from being assumed beneath the same attractive front photograph.
Label options as options and keep their questions separate
Base direction, alternative route, and decision required
Open decisions should remain visible
If two hardware choices or strap paths are being considered, give each one its own description and state what the buyer needs to learn from comparison. Do not merge an optional component into a final SKU. A transparent RFQ gives the sourcing team a better basis for discussion and preserves the buyer’s right to approve the next route deliberately.
Use the CTA to advance a real procurement decision
Sample requirement, quote scope, destination, and buyer owner
The next step should be specific
End with the precise result you need and the person responsible for accepting it. You may need an operation sample, a pack assessment, or a response tied to one approved configuration. Add market and destination information that is already known. We will keep the discussion attached to the adjustable mask brief you supply, not to an undefined retail category. Retain the RFQ version, supporting references, and named buyer decision in one controlled location. This makes the next supplier response easier to compare and protects the programme from restarting with a vague term such as adjustable when the team has already specified a distinct mechanism route. The request then becomes a working procurement document rather than a broad category inquiry that shifts meaning whenever a new product stakeholder joins the discussion.
Buyer questions about Adjustable strap and fit mechanism
Does an adjustable mechanism mean universal fit?
No. Fit and range need to be evaluated against agreed wearer criteria and the selected sample.
Can this page claim mechanism durability?
No. Durability needs a defined requirement and evidence basis.